
How to Solve Basement Moisture Problems
Last updated April 2020
There are a number of ways to treat below-ground rainwater leakages, with advantages and disadvantages to each.
Gutters and Downspouts
The first step is to check gutters and downspouts. Even if they are not producing basement water problems, they might be causing wood rot or mortar erosion on the exterior of the house.
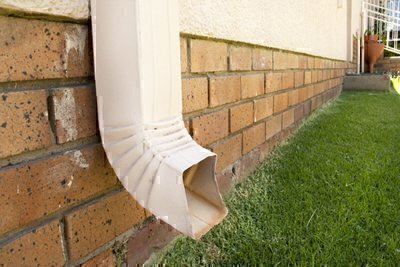
Clean gutters, repair holes, and make sure they slope toward downspouts and have not come loose from the house, allowing water to fall directly from the roof to the ground. Check downspouts to make sure they have not rusted out and that joints are tight—particularly at the ground-level elbow. Make sure downspouts spill water at least three or four feet away from the house.
One technique is to have the water spill onto a splash block that slopes downward and away from the foundation. Another is to extend the downspout—either above ground or through an underground plastic drainpipe—and spill it above-ground onto a part of your lawn that slopes away from your house or into a storm sewer.
You can often extend downspouts for less than $15 each; gutter work can be considerably more expensive. But these improvements are usually worth the cost, even if they only partially solve the water problem.
 Grading
The next step: Be sure the soil around your house is properly graded. The earth should drop about one inch per foot going away from your house for about six to eight feet out. The grading should consist of fill soil with a clay content of 20 to 30 percent. Don’t use sandy soil or soil containing a lot of organic matter; it will not shed water adequately.
Before adding dirt around your foundation, rake out all old mulch, leaves, and ground cover. If they are filled over, they will create a shelf that catches water.
A grading solution obviously has important advantages. It costs little—dirt, after all, is cheap—requires no great skill, and should move enough water away from your house to prevent serious harm.
If portions of your yard slope toward your house, you may have to cut a shallow ditch—or swale—to divert water. A swale is a U-shaped shallow ditch dug perpendicular to the water flow. A swale is not difficult to construct. It should be 1 1/2 to six feet wide and a few inches deep, and sloped from one end to the other, to divert water away from the house. Digging a swale is more like scraping away the surface than excavating a trench. After you form the swale, plant it with grass seed or ground cover to prevent erosion.
Regrading or diverting surface water will solve most basement moisture problems, but it may not always be the best approach. In rare cases, it costs more than other solutions—for instance, if you have to rebuild an elaborate patio that slants toward your house, or if you have to redo extensive landscaping in the problem area. Furthermore, grading is not a sure cure for leakage problems; water may be penetrating your basement from places that originate well away from your house. Finally, sometimes regrading is a relatively frail solution; a little careless digging in your garden may produce a new source of leakage just after you have installed a home theater in your basement.

Excavating, Reparging, and Exterior Drainage Systems
If regrading and other surface drainage improvements don’t solve the problem, you may have to resort to more drastic—and expensive—methods.
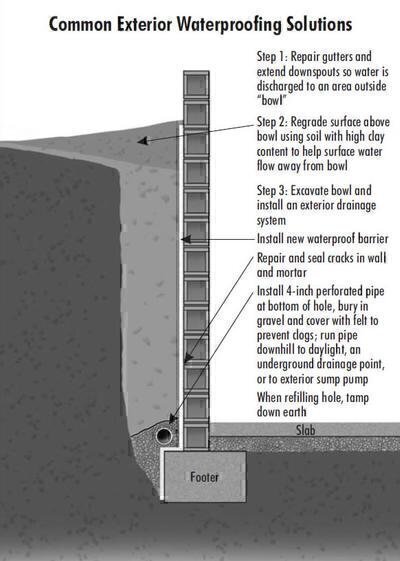
For most homes, the next best approach is to waterproof walls from the outside. To do this, a trench is dug to the depth of the footings of affected walls. Drainage pipe installed at the bottom of the trench collects water that seeps from above and carries it to a part of your yard away from your home or into a drainage pit. The exterior walls are reparged, with the parging at the bottom of the wall thickened to form a “cove” at the footing joint. A vapor barrier should also be added to exterior walls. Sometimes an exterior sump pump is needed to shoot water collected by the drainage pipe up and out of the collection area. If so, the pump must be buried in the ground deep enough to protect it from the cold; otherwise, it might freeze up in winter.
After installing new drainage pipe and reparging, the trench is filled with soil that is tamped down, and the surface area is regraded to improve surface drainage.
Obviously, because this procedure requires much more labor than simple regrading, it costs more. Plantings beside the house may have to be removed and replanted, and walkways, driveways, patios, porches, and other structures may have to be broken up and rebuilt.
Excavating and waterproofing from the outside might be more expensive than installing an interior drainage system with sump pump (see below). But our view is that, unlike interior systems, this will actually solve the underlying problem by diverting water away from walls, rather than simply managing water that enters the home. And despite what some basement waterproofing contractors might tell you, excavation work isn’t always more expensive than the interior solutions they are selling.
Interior Sump Pump
Improving exterior drainage with better downspout placement, regrading, excavating, or a combination of these approaches resolves most water seepage problems. But in some cases the problem must be addressed inside the home.
A relatively simple interior solution: Break a hole in the basement floor where water collects and dig a “sump pit” about two feet below the lowest part of the basement floor slab. Put a liner in the sump pit, and a pump that goes on whenever the water in it reaches a certain level. The pump connects to an electricity source, and a pipe is run from the pump up and through a wall to be discharged onto the ground outside and flow away from the house.
In this simple system, water that collects under the floor slab should find its way to the sump pit. If it works well, the sump pit and sump pump relieve pressure on both floor and walls. You can aid this relief by drilling holes into (but not all the way through) hollow block walls just above floor level to allow water that accumulates inside the wall cavity to drain out.
The main advantages of this approach are that it is relatively inexpensive ($1,000 to $2,000 to install a single sump pit and pump) and minimally disrupts interior and exterior structures. And if it doesn’t work, the sump can be used in a more elaborate interior drainage system.
The main disadvantage is that it may not solve the water problem. Water from other parts of the floor area or from outside the walls may not find its way to the sump pit. And the pump will wear out—sometimes in less than 10 years.
Because the sump pump is plugged into an electrical outlet, it won’t work during power outages—perhaps during heavy rainstorms when you need it most. If your basement is finished or contains valuables, consider paying an extra $500 to $1,000 for a sump pump with a battery backup system.
Once a sump pump is installed in your basement, periodically test and maintain it. Activate the pump (during dry spells) by pouring water into the sump pit. If it doesn’t turn on, it may be clogged with silt or burned out. Unplug the pump, remove it from the pit, and scoop out any silt. Then put one or two bricks in the bottom of the pit to allow more space for silt to accumulate. Reinstall the pump and retest it by pouring water into the pit. If it still doesn’t run, replace it.
Interior Drainage System
One way to make sure water finds its way to a sump pit or other discharge point is to build a drainage system. The floor is broken up around part of, or, depending on the extent of symptoms, the entire basement perimeter. A channel is dug beside the inside basement wall and connected to a discharge point. If the house has hollow block or brick walls, holes are drilled through the interior surface of the blocks to allow water from outside to pass into the hollow cores and drain out through the inside surface into the channel below the floor slab. If the house has poured concrete walls, holes are drilled between the walls and the footing. The drainage channel is filled with coarse gravel covering a four-inch perforated plastic drainage pipe located above or beside the footing that leads to the discharge point. The floor above the channel is then patched. This system can rely entirely on having water pass from the outside through or under the foundation to relieve pressure on outside walls.
An interior drainage system is most often used in combination with a sump pump, with the channel merely carrying water to the sump pit. But no sump pump is necessary if a drainage pipe can be passed through the foundation below floor level and run to a storm sewer or low place on the property where water can spill into the open.
The main advantage of an interior drainage system is that it is likely to work. Even though it won’t keep water from leaking through your basement walls, the system keeps the basement dry by collecting the water and pumping it out. Other than sump pump failure, about the only other risks are that the pipes will get clogged with silt or break. Such risks are minimal unless walls are seriously cracked, water flow is very heavy, or the structure undergoes excessive settling.
The major disadvantages of interior drainage systems are that they are expensive and sometimes require destruction of cabinets, paneling, flooring, and other expensive features of the home. In addition, when used with a sump pump, there is the risk of pump failure (a good reason for getting a pump with battery backup for finished spaces). And, as already discussed, interior systems don’t actually solve the problem of excessive water collecting next to exterior walls—they simply manage it.
Waterproofing Paints and Sealing Cracks
Sometimes very mild seepage problems can be solved—temporarily, at least—by applying waterproofing paint to interior walls or sealing cracks. It can be applied only on sound walls that have been properly prepared according to the product’s instructions.
This is a simple, cheap approach—but it usually does not work. Paints and sealants don’t divert water away from walls, and you’ll probably have to retackle the problem later.